Workshops & experiments

Activities you can run yourself. Each of these started as a way to make lived experience shareable: with sensors, cameras, microphones, or a single photographic question. Take any of them, use them, and tell me what you learn.

The Phone Vibration Study
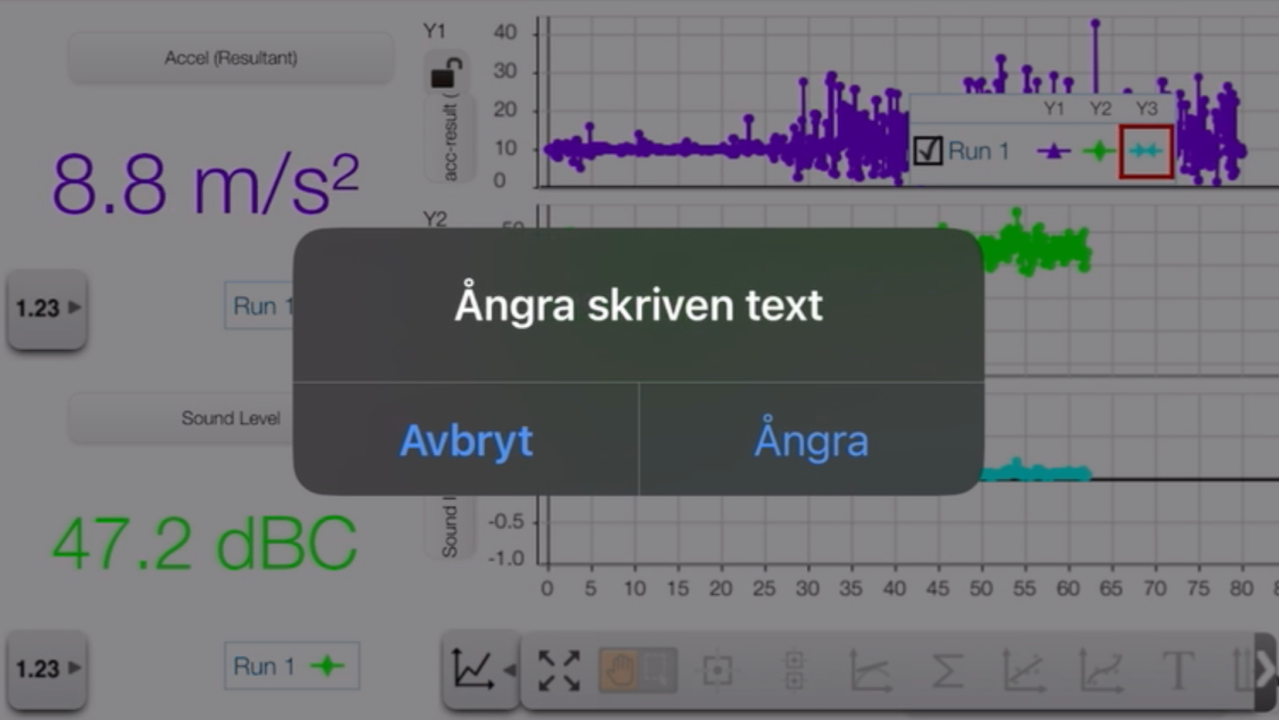
Experiment Documented. Edition #12 of the newsletter tells the full story

Screenshot of the SparkVue app from the walk, showing intense vibration graphs covered by an iPhone "Shake to Undo" prompt.
The app interface covered by the Shake to Undo prompt, a testimonial of the vibrations' intensity.

What it is

We attached my iPhone to my wheelchair, close to one of the small front wheels, and recorded the vibrations as I rode through a city full of cobblestones. The idea was simple: lived experience is hard to convey in words, so let the sensors testify instead. We also tried the same setup on a walker and a rollerbag.

What it captured

Within minutes, the vibrations were so violent that they triggered the iPhone’s “Shake to Undo” feature. The phone concluded that something this rough must be a mistake. It is not a mistake. It is designed cobblestones, chosen materials, accepted standards, normalised harms. That prompt, meant as a convenience, became the experiment’s testimonial.

How to run it

  1. Get the app: download SparkVue by Pasco Scientific.
  2. Select sensors: “Build new experiment” (top menu option) → choose “Sensor Data” (button in the middle of the screen) → choose the “On-board Acceleration Sensor” → choose acceleration resultant or X-Y-Z axes, and pick a graph style.
  3. Mount the phone: use Velcro or a sturdy mount to attach it to a wheelchair, walker, or stroller, as close to the front wheels or axle as possible.
  4. Record: hit “Start” in SparkVue and roll over different surfaces. Use the phone’s screen-recording features to record a video of your screen.
  5. Optional: record video as well, for instance on a GoPro or Insta360 camera. This way, you can follow what happens over time, and even sync it to the screen-recording.

If you get stuck, send me a message.

What it feeds

The study became newsletter edition #12, Vibrating Inequality, and it grounds the argument that surfaces are design choices: the vibrations are not unfortunate side effects of historic cobblestones, they are the continuing impact of surfaces designed for walking feet, not rolling wheels. If you try it, please tell me what you learn.

Download the run sheet (PDF, 74 kB). One page, ready to bring along

Read the full story: Vibrating Inequality – Testimonial from an iPhone →

The 360-Degree City Walk

Experiment Recorded. Footage from Gothenburg, public form to come

What it is

We walked through Gothenburg carrying 360-degree cameras while I rode the same streets in my wheelchair. Where an ordinary camera records the path ahead, a 360 camera records the whole situation: the ground, the people, the signs, the detours, the sounds. Everything that is going on around a body moving through the city.

What it captures

A first-person bubble of what the city is like from the chair. The footage holds the things that are hard to point at afterwards: how a route suddenly becomes a detour, what happens around you while you concentrate on the ground, how the street sounds as you move through it. Together with the vibration study, it records the same journey in different senses.

How to run it

The setup is undemanding: one 360 camera (we used an Insta360) mounted on or carried alongside the chair at eye height, and a route that mixes surfaces and situations: a square, a shopping street, a park path, a crossing. Record continuously rather than in clips. The uneventful stretches matter too: they show what an undramatic, welcoming route is like.

What it feeds

I still have the footage, and I am working out its public form. 360 material is heavy to host and needs care in the editing. It connects to our research on how cities can be tested from lived perspectives before they are built, including work with Gothenburg’s digital twin.

The Surface Audio Recording

Experiment In progress. First recordings under way (July 2026)

What it is

I have attached pickup microphones to my wheelchair, the kind musicians clip onto instruments. They record the sound of the wheels rolling over different surfaces: cobblestones, flat floors, paving. I tested the equipment for the first time in July 2026, and the first proper recordings are under way.

What it captures

Every surface has a sound. A smooth floor is almost silent. Cobblestones are a rattle loud enough to make conversation with walking companions difficult. The recordings make that difference shareable: instead of describing what a surface does to a body, you can let people hear it. And, just as important, listen for the quiet parts as well. That’s where life flows.

How to run it

The method is still settling. This section will grow as the recordings do. The short version: contact or pickup microphones mounted near the wheels, a small recorder, and the same mixed route you would choose for the vibration study. Recording the same stretch of street in sound, vibration, and video builds a rich, layered testimony of what the ground actually does.

What it feeds

The recordings join my field material, alongside the photographs and the vibration graphs: the city’s surfaces, made audible. Sound clips will appear here once I have recordings worth sharing.

Where it began: Vibrating Inequality – Testimonial from an iPhone →

Can You Photograph Belonging?

Exercise Live. The form is open

What it is

An open exercise built around one question: can you photograph belonging? It began as the spring challenge in edition #17 of the newsletter. You look for a place or a detail where design expresses that you (or someone else) already belong, or where it expresses the opposite. Photograph it, give it a belonging score from 1 to 5, and describe what you noticed.

What it captures

The photographs are less about the places than about the noticing. Belonging is usually silent: design that welcomes you rarely announces it, while design that doesn’t often does. Learning to see that difference, and to catch it in a photograph, is the exercise’s real work.

How to run it

You can do it alone through the form, right now, in a few minutes. It also works as a group exercise: agree on the question, walk for half an hour, photograph, then compare what different people saw in the same environment. The comparison is where it gets interesting: the same corridor produces very different photographs depending on who is looking and gets an impulse to take a photo.

QR code that opens the contribution form at tally.so/r/obOl91 Scan with your phone, or tap the code, to open the form.

What it feeds

Contributed photographs (with your permission) join the research corpus behind my work on categorisation and belonging, several hundred photographs of signs, entrances, and environments read closely for what they express about who is expected and what they create in terms of belonging.

Download the run sheet (PDF, 75 kB). One page, ready to bring along

Try it: the form is open →

The Universal Design Photo Workshop

Workshop The workshop I have run more times than any other

What it is

The workshop I have run more times than any other, with students and workshop participants of many kinds. The task is one sentence: photograph things that either align with or break with Universal Design. Then we gather and look at what everyone found.

What it captures

What you photograph reveals what you are trained to see. Different people walk the same building and return with entirely different pictures. The workshop makes that difference visible and discussable. Over the years, the photographs from these walks have also become research material in their own right: a growing corpus of how design expresses who is expected.

How to run it

  1. Introduce Universal Design first: when I run the workshop, the walk almost always follows an introduction to Universal Design, 30 to 60 minutes, that ends with presenting the task and sending the participants out. If you are not building your own introduction, the key ideas cover the same ground in text, and for Swedish-speaking groups the video series Att planera och bygga nonkluderande has episodes on Universal Design and nonclusion.
  2. Set the frame: pick one of the four framings below, hand out its run sheet in full, and give the task in one sentence. The open frame has no checklist at all. The other three give participants something concrete to hold in their hands, which I usually prefer, especially with groups new to Universal Design.
  3. Walk, together or spread out: the compact version happens wherever the workshop is: a campus, a building, a block, a station. Give it enough time that the participants stop photographing the obvious. With students I prefer to spread the workshop out when the schedule allows: let a few days pass between the introduction and the gathering, so the exercise happens in familiar environments, where they live, where they shop, along the routes they already know. Turning toward your usual environments with new ideas and a new gaze gives more than searching in entirely new places.
  4. Gather and show: each participant picks a few photographs, tells the group about their fieldwork, and motivates the choices: what made you raise the camera at exactly that moment, and what makes this align with or break with Universal Design? The motivations are where the learning sits. Each one is a small interpretation of what Universal Design means, tested against a real environment, and the group gets to hear as many interpretations as there are participants. That impulse has its own edition: Why Do We Grab Our Cameras When Something Feels Wrong – Or Right?
  5. Close on the experience: I usually end by asking how it was to do the exercise. Was there an aspect they particularly noticed, or one that was hard to work with? And the question I always finish with: what do you take with you? Among the most common feedback I get after a workshop, not least from students, is that participants start seeing aspects of Universal Design everywhere in their lives. It is almost like a threshold that you cross and can’t go back over.

Four ways to frame it

The same exercise, four run sheets. Pick the one that fits your group.

  1. The open frame (65 kB): one instruction, no checklist. Photograph what aligns with or breaks with Universal Design. The differences in interpretation are part of the material. I seldom run it this way myself, but the openness produces the widest spread of photographs.
  2. The seven principles (3 pages, 108 kB): the framing I have used the most. Participants carry the seven principles of Universal Design (Connell et al., 1997), which are concrete, easy to read, and easy to apply. The task is a pair per principle: one example that aligns with it and one that breaks it, so each participant returns with fourteen photographs, fourteen interpretations of Universal Design. The run sheet quotes all seven in full, with their guidelines, on its reference pages. It fits people who are new to Universal Design, and it always works.
  3. The eight goals (2 pages, 83 kB): the eight goals of Universal Design (Steinfeld & Maisel, 2012) reach further than the principles, into wellness, social integration, and cultural appropriateness. The same pair task applies: one example that advances each goal and one that works against it. The run sheet gives all eight on its second page. I have used them as an addendum to the principles. Here they carry a variant of their own.
  4. The nonclusive frame (2 pages, 94 kB): the lens my own research works through, aimed at situations. You photograph what is going on, and read how the design meets everyone in it: does it address the situation or sort the people, who can take part, where an “us and them” appears, and where everything simply flows.

What it feeds

The workshop is where much of my visual fieldwork method comes from, and where many participants first experience that Universal Design is something you can read off an environment. If you run it with your students or your team, I would genuinely like to hear what they photographed.

Download the run sheet (PDF, 65 kB). One page, ready to bring along